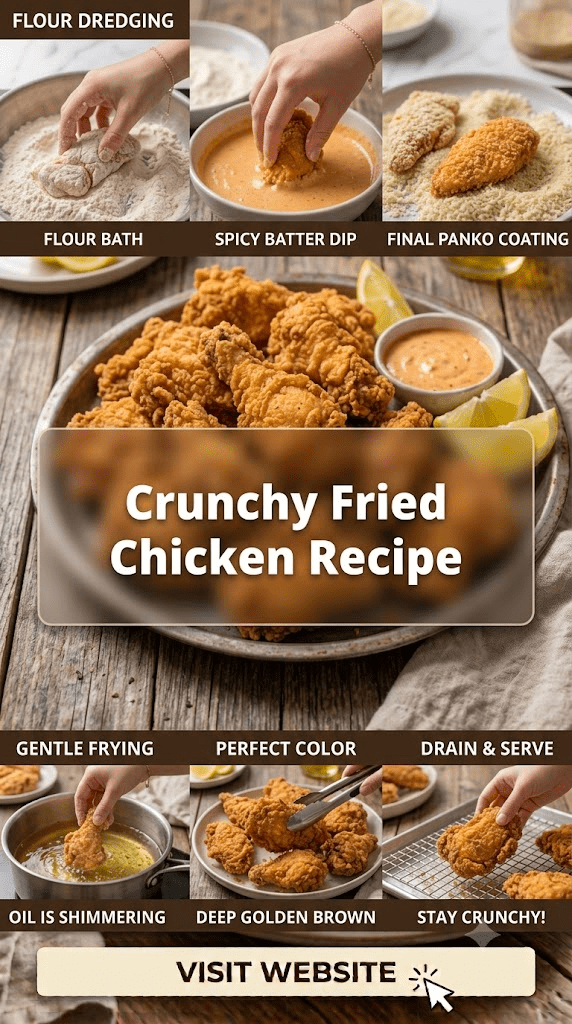
Cutlets Recipe for Weekend Cooking – For a Tasty Meal Without Complicated Preparation
Cutlets are one of those comforting homemade dishes that can turn simple ingredients into a satisfying meal. They are crispy on the outside, tender and flavorful on the inside, and versatile enough to serve for lunch, dinner, snacks, family gatherings, or weekend entertaining. This easy cutlets recipe is designed for home cooks who want delicious results without complicated preparation, unusual ingredients, or difficult cooking techniques.
The beauty of homemade cutlets is that you can prepare the mixture ahead of time, shape the cutlets according to your preference, coat them with breadcrumbs, and cook them whenever you are ready. They can be shallow-fried in a skillet for a golden crust, baked in the oven for a lighter option, or cooked in an air fryer for convenient everyday preparation.
This recipe uses a simple seasoned chicken mixture combined with potato, onion, herbs, spices, and breadcrumbs. The potato helps create a soft and cohesive center, while breadcrumbs provide structure and a crisp outer coating. A few basic seasonings add plenty of flavor without making the recipe complicated.
Whether you are cooking for your family or preparing food for a weekend get-together, these homemade cutlets are an excellent choice.
What Are Cutlets?
Cutlets are shaped portions of seasoned meat, poultry, vegetables, or a combination of ingredients that are usually coated and cooked until the outside becomes golden and crisp. Different cultures prepare cutlets in different ways, and the ingredients can vary considerably.
Some cutlets are made entirely with vegetables, while others contain chicken, beef, lamb, fish, or other proteins. Potatoes are frequently used because they add softness and help hold the mixture together.
For this recipe, chicken is combined with cooked potato, onion, fresh herbs, and simple spices. The mixture is shaped into small oval or round portions, coated with breadcrumbs, and cooked until crisp and golden.
The result is a flavorful cutlet with a crunchy exterior and a moist, tender center.
Why You Will Love This Cutlets Recipe
There are many reasons to add this recipe to your weekend cooking routine.
Simple ingredients
You do not need a long list of specialty ingredients. Most of the items can already be found in a typical kitchen.
Easy preparation
The filling is straightforward to prepare. Once everything is mixed, shaping and coating the cutlets is simple.
Crispy exterior
Breadcrumbs create a delicious golden crust when the cutlets are cooked properly.
Tender center
Potato and chicken create a soft, satisfying texture inside the crisp coating.
Make-ahead friendly
You can prepare and refrigerate the shaped cutlets before cooking.
Family-friendly
The seasoning can easily be adjusted. Reduce the chili if you prefer mild flavors or increase it if your family enjoys more spice.
Versatile serving options
Cutlets can be served with salad, bread, rice, vegetables, sauces, or simply enjoyed as a snack.
Cutlets Recipe at a Glance
Preparation Time: 30–40 minutes
Chilling Time: 20–30 minutes
Cooking Time: 20–25 minutes
Total Time: Approximately 1 hour 15 minutes
Servings: 6–8 people
Difficulty: Easy to moderate
Cooking Method: Shallow frying
Cuisine Style: Homemade comfort food
Ingredients Details
The following ingredient quantities make approximately 12–14 medium-sized cutlets.
| Ingredient | Quantity | Purpose |
|---|---|---|
| Boneless chicken | 500 g | Main protein |
| Potatoes | 2 medium | Adds softness and helps bind the mixture |
| Onion | 1 medium | Adds flavor |
| Garlic | 3 cloves | Adds savory depth |
| Ginger | 1-inch piece | Adds warmth and freshness |
| Green chilies | 1–2 | Adds mild heat |
| Fresh coriander | 3 tablespoons | Adds freshness |
| Ground cumin | 1 teaspoon | Adds earthy flavor |
| Ground coriander | 1 teaspoon | Adds balanced spice |
| Black pepper | ½ teaspoon | Adds gentle heat |
| Red chili powder | ½ teaspoon | Adds color and mild heat |
| Garam masala | ½ teaspoon | Adds aromatic flavor |
| Salt | 1 teaspoon or to taste | Enhances all flavors |
| Lemon juice | 1 tablespoon | Adds brightness |
| Egg | 1 large | Helps coating adhere |
| Breadcrumbs for mixture | ½ cup | Helps bind the filling |
| Breadcrumbs for coating | 1–1½ cups | Creates crispy exterior |
| Cooking oil | As needed | For shallow frying |
Optional Ingredients
You can also add a few optional ingredients according to your taste.
Chopped green onions
Two tablespoons of finely chopped green onions can add a fresh, slightly sweet flavor.
Dried herbs
A small amount of dried oregano or parsley can give the cutlets a different flavor profile.
Chili flakes
Add ¼–½ teaspoon if you enjoy extra heat.
Grated cheese
A small amount of grated cheese can be mixed into the filling for a richer version.
Carrot
A small amount of finely grated carrot can add color and mild sweetness.
Remember that additional moist ingredients can make the mixture softer, so adjust the breadcrumbs if necessary.
Choosing the Right Chicken
Boneless chicken breast works particularly well because it is lean and easy to cook. Boneless chicken thighs can also be used if you prefer a richer, more tender texture.
If using chicken breast, avoid overcooking it because dry chicken can make the finished cutlets less tender.
The chicken should be cooked completely before being shredded or finely chopped.
You can either boil the chicken gently in water or cook it with a small amount of seasoning. Allow it to cool slightly before processing it.
Choosing the Right Potatoes
Potatoes are important because they provide structure and moisture to the cutlet mixture.
Choose potatoes that become soft and fluffy after cooking. Avoid adding excessive water to the potatoes while preparing them.
After boiling, drain the potatoes thoroughly and allow them to release excess steam before mashing.
This small step can make a big difference.
If the potatoes contain too much moisture, the cutlet mixture may become sticky and difficult to shape.
Step-by-Step Cutlets Recipe
Step 1: Prepare the Chicken
Start by preparing the chicken.
Place 500 grams of boneless chicken in a saucepan. Add enough water to cover the chicken.
You can add a small pinch of salt, a piece of ginger, and a bay leaf if desired.
Bring the water to a gentle simmer.
Cook the chicken until it is completely cooked through.
The exact cooking time depends on the thickness of the chicken pieces, but boneless chicken generally takes around 12–18 minutes when gently simmered.
Do not rely only on the outside appearance. The chicken should be fully cooked in the center.
Once cooked, remove the chicken from the water and let it cool.
Step 2: Shred or Finely Chop the Chicken
Once the chicken is cool enough to handle, shred it using two forks.
Alternatively, finely chop it with a knife.
For cutlets, the chicken should not be left in large chunks.
Small pieces distribute more evenly throughout the mixture and make the cutlets easier to shape.
If you use a food processor, pulse the chicken briefly rather than turning it into a completely smooth paste.
A slightly textured chicken mixture produces a better bite.
Step 3: Cook the Potatoes
Peel two medium potatoes and cut them into similarly sized pieces.
Place them in a saucepan and cover with water.
Bring the water to a boil.
Cook until the potatoes are tender enough to mash easily with a fork.
Drain them thoroughly.
Let the potatoes sit for several minutes so excess steam can escape.
Then mash them until mostly smooth.
Do not add milk, butter, or water to the potatoes.
The potatoes need to remain relatively dry because the cutlet mixture already contains several moist ingredients.
Step 4: Prepare the Aromatics
Finely chop one medium onion.
You can either use the onion raw or lightly cook it.
For a sweeter and more developed flavor, heat a teaspoon of oil in a skillet and sauté the onion until softened and lightly golden.
Add finely minced garlic and ginger during the final minute.
Turn off the heat and let the mixture cool slightly.
Cooking the onion first reduces its sharpness and adds a deeper flavor to the cutlets.
Step 5: Prepare the Green Ingredients
Finely chop the fresh coriander.
If using green chilies, remove the seeds if you prefer a milder flavor.
Finely chop the chilies.
You want the pieces to be small enough to distribute evenly throughout the mixture.
Large pieces can make shaping the cutlets more difficult.
Step 6: Combine the Main Ingredients
Take a large mixing bowl.
Add:
- Shredded chicken
- Mashed potatoes
- Cooked onion
- Garlic
- Ginger
- Green chilies
- Fresh coriander
Mix gently using a spoon or clean hands.
At this stage, the mixture should begin to come together.
Avoid aggressively kneading the ingredients because excessive mixing can make the texture dense.
Step 7: Add the Seasonings
Add the following:
- 1 teaspoon ground cumin
- 1 teaspoon ground coriander
- ½ teaspoon black pepper
- ½ teaspoon red chili powder
- ½ teaspoon garam masala
- 1 teaspoon salt
- 1 tablespoon lemon juice
Mix thoroughly.
Taste a small amount of the mixture only if all ingredients are fully cooked and safe to taste.
Adjust the seasoning according to your preference.
Remember that the breadcrumbs added later will slightly dilute the seasoning, so the mixture should be pleasantly flavorful before shaping.
Step 8: Add Breadcrumbs
Add approximately ½ cup breadcrumbs to the mixture.
Start with a smaller amount and increase gradually if needed.
Mix everything together.
The finished mixture should be soft but firm enough to hold its shape.
If it feels too wet, add another tablespoon or two of breadcrumbs.
Do not add a large quantity at once.
Too many breadcrumbs can make the cutlets dry and dense.
Step 9: Check the Consistency
Take a small amount of the mixture and gently press it between your palms.
Try forming a small patty.
If it stays together without cracking or collapsing, the consistency is ready.
If it falls apart, add a little more breadcrumb.
If it feels extremely dry and crumbly, avoid adding too much more breadcrumb. Instead, check whether the ingredients were overcooked or whether the potato was too dry.
The ideal mixture should be soft, moist, and easy to shape.
Step 10: Chill the Mixture
Cover the bowl with food-safe covering and place it in the refrigerator for approximately 20–30 minutes.
Chilling is not absolutely mandatory, but it makes shaping much easier.
It allows the breadcrumbs and potato to absorb some moisture.
The mixture becomes firmer and easier to handle.
If you are preparing the cutlets for a gathering, you can keep the mixture chilled for several hours before shaping.
Step 11: Shape the Cutlets
Take a portion of the chilled mixture.
For medium cutlets, use approximately 2–3 tablespoons of mixture.
Roll it gently between your hands.
Flatten it into an oval or round shape.
Keep the thickness relatively even.
A cutlet that is too thick can take longer to heat through, while a very thin cutlet may become dry.
Aim for approximately 1–1.5 cm thickness.
Repeat until all of the mixture has been shaped.
Place the uncooked cutlets on a clean tray.
Step 12: Prepare the Coating Station
Set up three shallow dishes.
Dish 1
Plain flour, if desired.
Dish 2
One beaten egg.
Dish 3
Breadcrumbs.
The flour step is optional. It can provide an additional layer that helps the egg adhere.
For a simple preparation, you can skip the flour and use only egg and breadcrumbs.
Keep the stations close together so the coating process remains easy.
Step 13: Coat the Cutlets
Take one shaped cutlet.
Dip it into the beaten egg.
Make sure both sides are lightly coated.
Allow excess egg to drip back into the bowl.
Then place the cutlet into the breadcrumbs.
Press gently so breadcrumbs adhere to the surface.
Turn it over and coat the other side.
Lightly press the edges into the breadcrumbs as well.
Transfer the coated cutlet to a clean plate or tray.
Repeat with the remaining cutlets.
Step 14: Rest the Coated Cutlets
Once all cutlets are coated, allow them to rest for about 5–10 minutes.
This gives the coating a chance to adhere properly.
If you have time, refrigerating the coated cutlets for another 10–15 minutes can make frying easier.
The coating is less likely to separate when the cutlets are placed into the hot oil.
Step 15: Heat the Oil
Place a large skillet over medium heat.
Add enough oil to cover the bottom of the pan generously.
You do not need to deep-fry the cutlets.
Allow the oil to heat gradually.
The oil should be hot enough to create an immediate gentle sizzle when a breadcrumb touches it.
However, it should not be smoking.
If the oil is too hot, the breadcrumbs may burn before the center becomes properly heated.
If the oil is too cool, the cutlets may absorb excess oil and become greasy.
Medium heat is usually the safest starting point.
Step 16: Fry the Cutlets
Carefully place the coated cutlets into the skillet.
Do not overcrowd the pan.
Leave enough space between each cutlet so you can turn them easily.
Cook the first side for approximately 3–4 minutes, or until golden brown.
Then carefully turn the cutlets using a flat spatula.
Cook the second side for another 3–4 minutes.
The exact cooking time depends on the thickness of the cutlets and the heat of the pan.
Because the chicken and potato filling has already been cooked, the main goal is to heat the center thoroughly and develop a crisp, golden coating.
Step 17: Check the Color
Good cutlets should have a golden-brown exterior.
Do not judge them only by the clock.
Look at the surface.
If the coating becomes dark very quickly, reduce the heat.
If the cutlets remain pale after several minutes, the oil may not be hot enough.
The goal is an even golden crust.
Step 18: Drain the Cutlets
When the cutlets are cooked, transfer them to a plate lined with paper towels or place them on a wire rack over a tray.
A wire rack is especially useful because air can circulate underneath the cutlets.
This helps keep the bottom crisp.
Do not stack the cutlets immediately after frying because trapped steam can soften the crispy coating.
How to Make Cutlets Extra Crispy
If you want a particularly crisp exterior, use dry breadcrumbs.
For an even crunchier coating, use coarse breadcrumbs or panko-style breadcrumbs.
Another useful technique is double coating.
Dip the shaped cutlet in egg, coat it with breadcrumbs, dip it into egg again, and finish with another thin layer of breadcrumbs.
Do not make the coating excessively thick.
A moderate coating provides the best balance between crunch and the tender filling.
How to Prevent Cutlets From Breaking
One of the most common problems when making homemade cutlets is breaking during frying.
Fortunately, several simple techniques can prevent this.
Keep the mixture firm
If the mixture is too wet, it will not hold together properly.
Add breadcrumbs gradually until the mixture becomes shapeable.
Chill before shaping
Cold mixture is easier to handle.
Chill after coating
This helps the breadcrumbs adhere.
Do not flip too early
Allow the first side to form a crust before turning.
Use a wide spatula
A broad spatula provides better support.
Avoid overcrowding
Too many cutlets in the pan make turning difficult and can cause them to bump into one another.
How to Make Cutlets Without Frying
If you prefer oven cooking, you can bake the cutlets.
Preheat the oven to approximately 200°C.
Arrange the coated cutlets on a lightly greased baking tray.
Brush or lightly spray the tops with oil.
Bake until the coating becomes golden and the cutlets are heated through.
Turn them halfway through cooking so both sides can brown.
Because ovens vary, monitor the cutlets carefully toward the end of cooking.
For air-fryer preparation, arrange the cutlets in a single layer and lightly brush them with oil.
Cook according to your appliance’s recommended temperature and timing, turning halfway through.
Tips for Better Flavor
Good seasoning is the foundation of tasty cutlets.
Do not rely on chili powder alone.
A combination of cumin, coriander, black pepper, garam masala, fresh herbs, garlic, ginger, and lemon creates a more balanced flavor.
Fresh coriander gives brightness.
Garlic and ginger provide savory depth.
Cumin adds earthiness.
Garam masala gives warmth.
Lemon juice prevents the flavors from becoming heavy.
You can adjust each ingredient according to your taste.
Serving Suggestions
These cutlets can be served in many different ways.
With Green Chutney
A fresh herb chutney makes an excellent accompaniment.
The bright, fresh flavor works particularly well with the crisp cutlets.
With Yogurt Sauce
Combine plain yogurt with a little salt, lemon juice, chopped coriander, and black pepper.
Serve chilled alongside the warm cutlets.
With Salad
A simple salad of cucumber, tomato, onion, and lettuce creates a fresh contrast.
With Bread
Place a cutlet inside a soft bun with lettuce, tomato, cucumber, and sauce.
This creates a simple homemade sandwich.
With Rice
Cutlets can be served alongside plain rice or seasoned rice for a more substantial meal.
With Vegetables
Serve them with roasted, steamed, or sautéed vegetables.
Weekend Meal Idea
These cutlets are especially useful for weekend cooking because much of the preparation can be completed in advance.
On Saturday morning or afternoon, prepare the chicken and potatoes.
Make the filling and chill it.
Shape the cutlets and coat them with breadcrumbs.
Store them properly in the refrigerator.
When dinner time arrives, heat the skillet and cook the cutlets fresh.
This approach reduces last-minute preparation and gives you more time to focus on other dishes.
Make-Ahead Instructions
To make the recipe ahead of time, prepare the cutlets through the coating stage.
Place them in a single layer on a tray.
Cover them and refrigerate.
When ready to cook, take them from the refrigerator and cook them directly in a preheated skillet.
Avoid leaving raw or prepared food at room temperature for extended periods.
If you need to store the cutlets longer, freezing is a convenient option.
Freezing Cutlets
Uncooked coated cutlets can be frozen.
Arrange them in a single layer on a tray and freeze until firm.
Once frozen, transfer them to an airtight freezer-safe container or bag.
Separate layers with parchment paper so the cutlets do not stick together.
Label the container with the date.
When you are ready to cook them, follow safe thawing practices or cook according to a method appropriate for frozen prepared cutlets.
Cooking times may need to be adjusted.
Always make sure poultry-containing food is heated thoroughly.
Refrigerator Storage
Cooked cutlets should be cooled appropriately and stored in a covered container in the refrigerator.
For the best texture, reheat them in an oven, air fryer, or skillet rather than a microwave.
A microwave can make the breadcrumb coating softer.
A dry skillet or oven helps restore some of the crispness.
Always refrigerate leftovers promptly and use appropriate food-safety practices.
Reheating Tips
For oven reheating, place the cutlets on a baking tray and warm them until heated through.
For skillet reheating, use medium-low heat and turn the cutlets occasionally.
For air-fryer reheating, use a moderate temperature and heat until the center is hot.
Avoid overheating because the chicken can become dry.
The goal is to warm the center while restoring some crispness to the coating.
Common Mistakes to Avoid
Using Wet Potatoes
Excess moisture can make the mixture difficult to shape.
Drain boiled potatoes thoroughly.
Adding Too Many Breadcrumbs
Too many breadcrumbs can create a dry, dense filling.
Add them gradually.
Making the Cutlets Too Thick
Very thick cutlets may brown outside before becoming properly heated inside.
Keep them moderately thin.
Frying at Excessively High Heat
High heat can burn the breadcrumbs.
Medium heat gives you better control.
Overcrowding the Pan
Crowding reduces the temperature of the cooking surface and makes flipping difficult.
Cook in batches if necessary.
Turning Too Frequently
Repeated turning can disturb the crust.
Allow one side to brown before flipping.
Skipping the Chilling Step
Although optional, chilling makes the mixture much easier to handle.
How to Adjust the Recipe for Kids
If you are serving the cutlets to children, reduce or omit the green chilies and red chili powder.
Keep the seasoning mild while retaining garlic, ginger, cumin, and coriander for flavor.
You can also make smaller cutlets that are easier for children to hold.
Serve them with a mild yogurt dip or ketchup.
How to Make Spicy Cutlets
For a spicier version, increase the green chilies.
You can also add chili flakes or a little extra red chili powder.
Another option is to serve a spicy sauce on the side rather than making the entire mixture hot.
This gives family members the ability to adjust the heat individually.
How to Make Cheese-Filled Cutlets
For a special weekend version, place a small amount of grated cheese in the center of each cutlet.
Take a portion of the mixture and flatten it.
Place a small amount of cheese in the center.
Fold the mixture around the cheese and seal the edges carefully.
Shape it into a smooth patty.
Coat and cook as usual.
Make sure the edges are completely sealed so the cheese does not escape during cooking.
How to Make Vegetable Cutlets
The same basic technique can be used to make vegetarian cutlets.
Replace the chicken with cooked vegetables such as peas, carrots, corn, beans, and potatoes.
Mash the vegetables lightly.
Add breadcrumbs, herbs, spices, and seasoning.
Shape the mixture into patties.
Coat with breadcrumbs and cook until golden.
Vegetable cutlets are a convenient way to use leftover cooked vegetables.
How to Make Beef or Lamb Cutlets
You can replace chicken with cooked minced beef or lamb.
Brown the minced meat thoroughly with onion, garlic, and ginger.
Allow it to cool before combining it with mashed potato.
Use the same basic seasoning and coating method.
Because different meats have different textures, you may need to adjust the breadcrumbs.
The mixture should remain soft enough to produce a tender cutlet while firm enough to hold its shape.
Flavor Variations
Garlic Herb Cutlets
Increase the garlic and add chopped parsley.
Lemon Pepper Cutlets
Use additional black pepper and lemon zest.
Spicy Masala Cutlets
Add a little extra chili powder, cumin, coriander, and garam masala.
Cheesy Cutlets
Add grated cheese to the filling or place cheese in the center.
Fresh Herb Cutlets
Use a combination of coriander, parsley, and green onions.
Each variation creates a slightly different flavor while using the same basic cooking method.
The Science Behind a Good Cutlet
There are several simple cooking principles behind a successful cutlet.
The potato provides starch, which helps the ingredients hold together.
Breadcrumbs absorb excess moisture.
Egg creates a coating that allows the outer breadcrumbs to adhere.
Heat causes the exterior coating to brown and become crisp.
The Maillard reaction contributes to the attractive golden color and savory flavor that makes fried foods so appealing.
Managing moisture is particularly important.
Too much moisture produces a weak mixture.
Too little moisture produces a dry filling.
The ideal cutlet sits between these two extremes.
Texture Guide
A perfectly prepared cutlet should have several contrasting textures.
The exterior should be crisp.
The immediate layer beneath the crust should be tender.
The center should remain moist and flavorful.
The cutlet should hold its shape when picked up but should not feel hard or dense.
If your cutlets are too firm, reduce the breadcrumbs slightly next time.
If they fall apart, increase the binding ingredients gradually and chill the mixture before shaping.
How to Know When the Cutlets Are Ready
The outside should be golden brown and crisp.
The center should be hot.
Because the chicken is cooked before being incorporated into the mixture, the final cooking stage mainly reheats the filling and cooks the coating.
However, always handle and store poultry safely.
If you are uncertain about whether food has been heated sufficiently, use a food thermometer and follow food-safety guidance for poultry.
Perfect Cutlet Shape
The shape is mostly a matter of personal preference.
Oval
Traditional and attractive for serving.
Round
Easy to shape and excellent for sandwiches.
Small rounds
Perfect for appetizers and parties.
Long patties
Useful for placing inside buns.
Whatever shape you choose, keep the thickness consistent.
Uniform pieces cook more evenly.
How Many Cutlets Does This Recipe Make?
Using approximately 2–3 tablespoons of mixture per cutlet, the recipe produces around 12–14 medium cutlets.
For appetizers, you can make 18–20 smaller cutlets.
For large meal-sized portions, make approximately 8–10 larger cutlets.
Try to keep all pieces approximately the same size so they finish cooking at a similar time.
Scaling the Recipe
If you need to serve a larger group, the recipe can easily be doubled.
For example, use 1 kilogram of chicken and 4 medium potatoes.
Increase the remaining ingredients proportionally.
However, do not feel that every seasoning needs to be doubled exactly.
Seasoning intensity can vary depending on the size of the onions, potatoes, and chicken.
Taste and adjust when appropriate.
Budget-Friendly Tips
Cutlets are naturally budget-friendly because a moderate amount of chicken can be combined with inexpensive potatoes and breadcrumbs.
Using leftover cooked chicken is another way to reduce food waste.
Leftover boiled potatoes can also be incorporated.
Homemade breadcrumbs made from dried bread can replace store-bought breadcrumbs.
Fresh herbs can be adjusted according to availability.
You do not need expensive ingredients to make flavorful cutlets.
A Simple Weekend Cooking Schedule
If you want to prepare these for a weekend dinner, use the following schedule.
Earlier in the day
Cook the chicken.
Boil the potatoes.
Prepare the onion, garlic, and ginger.
1–2 hours before dinner
Mix the filling.
Season it.
Add breadcrumbs.
Chill the mixture.
30–45 minutes before dinner
Shape the cutlets.
Coat them with egg and breadcrumbs.
Return them to the refrigerator.
Just before serving
Heat the skillet.
Cook the cutlets in batches.
Drain them.
Serve immediately with your favorite sauces and sides.
This schedule keeps the final cooking stage simple and stress-free.
Frequently Asked Questions
Can I use leftover chicken?
Yes. Cooked leftover chicken can be shredded or finely chopped and used in this recipe, provided it has been stored safely.
Can I make the cutlets without eggs?
Yes. You can use another suitable coating method, such as a thin flour-and-water mixture, depending on your dietary preferences.
Why are my cutlets falling apart?
The mixture may contain too much moisture or not enough binding material. Add breadcrumbs gradually and chill the mixture before shaping.
Can I use panko breadcrumbs?
Yes. Panko-style breadcrumbs can produce a particularly crisp exterior.
Can I bake these cutlets?
Yes. Arrange them on a greased baking tray and cook in a preheated oven until golden and heated through.
Can I air fry them?
Yes. Arrange them in a single layer, lightly oil the surface, and cook according to your air fryer instructions.
Can I make them spicy?
Absolutely. Increase green chilies, chili flakes, or red chili powder according to your preference.
Can I prepare them the day before?
Yes. You can prepare and refrigerate the shaped cutlets ahead of time.
What sauce goes best with cutlets?
Green chutney, yogurt sauce, tomato ketchup, garlic sauce, or a simple chili sauce all work well.
Can I use chicken thighs?
Yes. Boneless chicken thighs can create a richer and more tender texture.
Troubleshooting Guide
Problem: Cutlets fall apart in the pan
Possible cause: Mixture is too wet.
Solution: Add a small amount of breadcrumbs and chill the mixture.
Problem: Coating comes off
Possible cause: Cutlets were not chilled or were turned too soon.
Solution: Let the coating set before cooking and allow the first side to brown before flipping.
Problem: Cutlets are greasy
Possible cause: Oil was not hot enough.
Solution: Make sure the oil is properly heated before adding the cutlets.
Problem: Outside burns quickly
Possible cause: Heat is too high.
Solution: Reduce to medium or medium-low heat.
Problem: Center feels dry
Possible cause: Too much breadcrumb or overcooking.
Solution: Use breadcrumbs sparingly and cook only until the exterior is golden and the center is heated.
Problem: Cutlets taste bland
Possible cause: Insufficient seasoning.
Solution: Season the mixture before shaping and adjust the spices according to taste.
Professional-Style Tips for Better Results
Even though this is a simple homemade recipe, a few professional techniques can make a noticeable difference.
First, keep the ingredients relatively dry.
Second, allow the cooked chicken and potatoes to cool before mixing.
Third, season the mixture evenly.
Fourth, chill before shaping.
Fifth, keep the cutlets uniform in size.
Sixth, use fresh breadcrumbs or good-quality dry breadcrumbs.
Seventh, maintain consistent cooking temperature.
Finally, avoid rushing the browning process.
A beautiful golden crust develops when the cutlet has enough contact with properly heated oil.
What to Serve for a Complete Meal
For a complete weekend meal, serve the cutlets with several simple sides.
A fresh cucumber and tomato salad provides freshness.
A yogurt dip adds creaminess.
A small bowl of chutney adds brightness and spice.
Rice or bread can make the meal more filling.
Roasted vegetables provide another nutritious side.
You can also serve the cutlets as part of a larger family-style spread with several sauces and salads.
Turning Cutlets Into Sandwiches
These cutlets are excellent for homemade sandwiches.
Toast a soft bun lightly.
Add lettuce.
Place a warm cutlet on top.
Add tomato and cucumber.
Spread yogurt sauce, mayonnaise, chutney, or another preferred sauce.
Finish with a second half of the bun.
The crispy cutlet contrasts beautifully with the soft bread and fresh vegetables.
For a lunchbox-friendly version, allow the cutlet to cool appropriately before assembling.
Turning Cutlets Into Appetizers
For parties, make smaller cutlets.
Use approximately one tablespoon of mixture for each piece.
Shape them into small rounds.
Coat and fry them until golden.
Serve on a platter with several dipping sauces.
Small cutlets are easy to pick up and work especially well for casual gatherings.
You can garnish the platter with fresh herbs and lemon wedges.
Final Recipe Summary
This homemade cutlets recipe proves that a delicious weekend meal does not require complicated preparation.
The basic process is simple:
- Cook the chicken.
- Shred or finely chop it.
- Boil and mash the potatoes.
- Prepare the onion, garlic, and ginger.
- Combine the chicken and potatoes.
- Add herbs and spices.
- Mix in breadcrumbs.
- Chill the mixture.
- Shape the cutlets.
- Dip them in beaten egg.
- Coat them with breadcrumbs.
- Chill briefly again.
- Heat the oil.
- Fry until golden.
- Drain properly.
- Serve hot with sauces and sides.
The key to excellent cutlets is balance. The mixture should be moist but not wet, firm but not dense, flavorful but not overpowering, and crisp outside while remaining tender inside.
Once you understand this basic technique, you can easily customize the recipe with different meats, vegetables, spices, herbs, cheeses, and coatings.
Easy Homemade Cutlets Recipe Card
Recipe: Homemade Chicken Cutlets
Servings: 12–14 medium cutlets
Prep Time: 30–40 minutes
Chilling Time: 20–30 minutes
Cooking Time: 20–25 minutes
Total Time: About 1 hour 15 minutes
Main Ingredients
- 500 g boneless chicken
- 2 medium potatoes
- 1 medium onion
- 3 garlic cloves
- 1-inch ginger
- 1–2 green chilies
- 3 tablespoons fresh coriander
- 1 teaspoon cumin
- 1 teaspoon ground coriander
- ½ teaspoon black pepper
- ½ teaspoon red chili powder
- ½ teaspoon garam masala
- 1 teaspoon salt
- 1 tablespoon lemon juice
- ½ cup breadcrumbs for the mixture
- 1 egg
- 1–1½ cups breadcrumbs for coating
- Oil for shallow frying
Cooking Method
Cook the chicken until completely done, cool it, and shred or finely chop it. Boil the potatoes until tender, drain thoroughly, and mash them. Sauté the onion with garlic and ginger. Combine the chicken, potatoes, onion mixture, coriander, chilies, spices, salt, lemon juice, and breadcrumbs. Chill the mixture for 20–30 minutes.
Shape the mixture into evenly sized oval or round cutlets. Dip each cutlet in beaten egg and coat completely with breadcrumbs. Let the coated cutlets rest for several minutes.
Heat oil in a skillet over medium heat. Fry the cutlets in batches until both sides are golden brown and crisp. Avoid overcrowding the pan. Transfer cooked cutlets to a rack or paper towel-lined plate.
Serve hot with green chutney, yogurt sauce, ketchup, salad, bread, rice, or your favorite side dishes.
Final Thoughts
Homemade cutlets are an excellent recipe to keep in your regular cooking collection because they are flexible, affordable, and easy to customize. The combination of tender chicken, soft potato, aromatic spices, fresh herbs, and crisp breadcrumbs creates a satisfying dish that feels special without requiring complicated cooking skills.
The recipe is particularly suitable for weekends because you can prepare the mixture and shape the cutlets ahead of time. When you are ready to eat, simply heat your skillet and cook them until golden.
Once you become comfortable with the basic recipe, experiment with different seasonings, vegetables, herbs, sauces, and fillings. You can make spicy cutlets, cheesy cutlets, vegetable cutlets, mini appetizer cutlets, or hearty sandwich cutlets using the same basic technique.
For the best results, remember the most important principles: keep the filling balanced, avoid excess moisture, chill before shaping, coat the cutlets evenly, maintain medium cooking heat, and avoid turning them before the crust has formed.
With these simple techniques, you can make crisp, flavorful, tender homemade cutlets that are perfect for a relaxed weekend meal, family dinner, casual gathering, or satisfying homemade snack.